OK, seven of my last ten posts have been related to my iPad. It really is awesome! However, this is a technology in education blog, not an iPad blog. To that end I've begun documenting my iPad knowledge on a Google Site. As I learn new stuff I'll add it there. If I make get any huge revelations I'll blog about them here as well. I may also periodically post a list of updates here so they'll show up in your RSS feed.
Anyway, I promise to get back to my ongoing investigation into how technology can be a powerful tool for transforming teaching. You can find my collected ramblings on the iPad at ipad.flosscience.com
Showing posts with label flosscience. Show all posts
Showing posts with label flosscience. Show all posts
Thursday, December 23, 2010
Saturday, September 06, 2008
I hate Lecture
Last week I started my physics class with Relativity in Week One (pdf). A short unit by E.R. Huggins. I really like this unit, but it is totally contrary to how I usually teach as I had to lecture the whole week. This year I have four sections of Physics, in the past I've only had three. That extra section makes a big difference. My experience from last week reinforces my plans to not lecture in class this year.
So, this year I will be lecturing on video and students will be able to watch on their own time. This will leave more time in school for working problems. Basically, those tasks that may have been homework in the past will now be class work. So, when a student gets stuck they can ask me for help rather than just copying off a classmate. In addition, this may allow me to sneak in a few more labs.
The videos can be streamed from the web from either Blip.tv or the archive.org. They can also be downloaded via iTunes and played on home computers or portable media players. If needed, I will burn a small number of DVDs of my videos for students who might not have a computer at home.
So far I've been using TipCam to do screen captures and as needed I also use a small Wacom tablet I bought on ebay to write on the screen. I'll be listing all the videos on my FLOSScience site as I create them. Feel free to use them with your own classes or just use them as a source of inspiration.
In an effort to keep my life easy, my goal is to do my videos in one take. Basically, this means they will likely be a little rough at times. Below is the first part of my lecture from chapter 2 of our text book (modeling one dimensional uniform motion).
Friday, August 08, 2008
Google Earth in Physics?
Google Earth allows for the creation of custom content by users. The easiest way is to create a kml or kmz file. kml and kmz files are fairly easy to create (or modify). It is just a mark-up language. If you can code html you can code kml files (they're not the same, but are similar). KML Tutorial. For those who don't want to delve into the code you can create these files within Google Earth itself. I mention kml amd kmz because this is the format you will save Google Earth files in if you want to make them available for others.
A kml file is simply a small text file with instructions for Google Earth to interpret. KMZ files are compressed archives of files. A KMZ file includes the KML file and any other files (like pictures) the KML refers to. I was playing around the other day and created a KMZ file from a nature walk (crosswinds marsh.kmz) my son and I took. I plotted our path (using my GPS) and took pictures along the way. I placed pins in Google Earth and edited their descriptions, to include the pictures. You can use html code in the description to change text style, include links to the web, bring in pictures, or even some web videos. I put the path and the pins in a folder in GE and saved the folder as a KMZ file.
I created the path using GPS Visualizer, a web application that converts GPS files to other formats, including KML or KMZ files. This allows me to use my GPS unit with the free version of Google Earth. Normally, you can only use a GPS unit with Google Earth Plus.
In the newest version of Google Earth Beta 4 they took some of the premium features from the paid version and brought them over to the free version, including the ability to create paths and polygons. So, if you don't have access to a GPS unit it would be easy enough to draw a nature walk and incorporate pictures from the walk as pins. Or have a student studying the Tundra biome outline the tundra and have pins marking points of interest with pictures and information. This would be a lot more fun than having the exact same information in a report or powerpoint presentation.
HTML Primer for Google Earth: This shows some very basic html code you can use in your placemarks within Google Earth. A quick search of the internet will yield a lot more.
Google Earth in Physics
For more go to the Google Earth Page on FLOSScience.com
Saturday, August 02, 2008
Graphing Calculator Tutorials (TI-83 & TI-84)
Last year I started creating calculator tutorials using Jing. I like Jing, unfortunately you are stuck in a proprietary format and I haven't had any real luck in converting it to another format. So, I don't really use it anymore. Regardless, the tutorials I created last year were done more for a teacher as the audience and I decided I really want some with my students as the audiance. Consequently, I'm redoing them.
I rely on my students knowing how to use their graphing calculators in my Physics class. Consequently, I spend a bit of time at the beginning of the school year teaching them how to use them. Unfortunately, they often loose skills they once had as we go along. So, this year I've decided to handle things differently. I will spend less time in class teaching them and more time teaching them at home. I'm in the process of creating some videos to help teach the skills they need. Don't expect high production values on these. My goal will be to do them in one take and to simply upload when done (no post editing).
Why am I doing this? Two reasons really. The first is so I don't have to spend too much class time covering it. The second is that the videos will stay on the internet, so if they need to review later in the semester they can.
Below is the first video in the series. To see more calculator videos as I create them just surf over to my FLOSScience site.
Monday, July 21, 2008
GIS - Geographic Information Systems
I taught Environmental Science a number of years ago and I came across all of this then. Some of this material may be a little outdated. I will be working on it this summer to help out a good friend of mine who will be teaching Environmental Science this year. GIS, or Geographic Information Systems, is basically taking data and plotting it on maps. By mapping the data it is often much easier to spot patterns or trends. In education GIS can be a perfect tool for inquiry based labs.
The simplest GIS activity I've ever done with my class was to pass out maps of South East Michigan that I'd gotten from the Secretary of State or the Department of Transportation (I can't remember which). Then in groups of trhee I had students use markers or crayons to trace all th rivers and streams. By highlighting this data students were able to quickly identify the different watersheds in our area. We live in the Rouge River Watershed which covers a large area and funnels down to one very polluted river. Once the watershed was "outlined" in this way it was easy for students to understand why it is still so polluted even given all the programs aimed at changing this.
GIS becomes even more powerful when we bring the power of computers to bear. Below are listed some free programs for analyzing data. The easiest is probably Google Earth, but I highly recommend giving ArcExplorer a try.
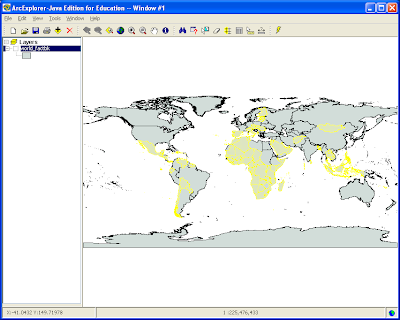 I created this map as an example of some of the cool questions you can ask. It was created in ArcExplorer using data from the 2006 CIA World Fact Book. The highlighted countries have more than twice as many active cell phones as traditional telephones. This is really cool, it demonstrates how many developing countries are leap-frogging technologies and not even bothering to build the infrastructure necessary to support more out dated traditional phones.
Cross posted from www.flosscience.com
The simplest GIS activity I've ever done with my class was to pass out maps of South East Michigan that I'd gotten from the Secretary of State or the Department of Transportation (I can't remember which). Then in groups of trhee I had students use markers or crayons to trace all th rivers and streams. By highlighting this data students were able to quickly identify the different watersheds in our area. We live in the Rouge River Watershed which covers a large area and funnels down to one very polluted river. Once the watershed was "outlined" in this way it was easy for students to understand why it is still so polluted even given all the programs aimed at changing this.
GIS becomes even more powerful when we bring the power of computers to bear. Below are listed some free programs for analyzing data. The easiest is probably Google Earth, but I highly recommend giving ArcExplorer a try.
- NASA World Wind - Free and Open Source program from NASA. Visualize the Earth as a 3D globe that you can easily map a variety of data onto. Yes, I know this sounds a lot like Google Earth. It is not quite as easy to use as Google Earth, but it already includes much of the scientific data that you have to download separately and add into Google Earth. You should give it a look and see if it will give you a few more things than GE will. It also includes the Moon and Mars. Be sure to check out the World Wind Wiki for more info and add-ons. The World Wind Wiki offers a comparison with Google Earth. Or if you prefer, here's a 3rd party comparison.
- Google Earth Ideas - Google Earth is free from Google, although there are paid versions as well. The newest version allows for easy integration of SketchUp Buildings.
- Arc Voyager SE - Cool program that comes with ready made activities. ArcVoyager really begins to show the power of GIS. (This is still available, but it has been supplanted by Arc Explorer. Personally I haven't used ArcExplorer in class yet, which is why I still list ArcVoyager)
- Create Custom Maps from online data. (Earth Exploration Toolbook)
- Earth Science Lesson focusing on mapping earthquake data. (Earth Exploration Toolbook)
- Looking into the Earth using earthquake wave speed data. (Earth Exploration Toolbook)
 I created this map as an example of some of the cool questions you can ask. It was created in ArcExplorer using data from the 2006 CIA World Fact Book. The highlighted countries have more than twice as many active cell phones as traditional telephones. This is really cool, it demonstrates how many developing countries are leap-frogging technologies and not even bothering to build the infrastructure necessary to support more out dated traditional phones.
Cross posted from www.flosscience.com
Saturday, July 12, 2008
New Direction
So, I haven't really been blogging as much this past year. So, what's the solution? More blogs to update. I'll be starting another blog or two that have a slightly different focus than this one. I wanted to keep this blog mostly focused on teaching with technology, but I often have good science ideas that aren't really technology based and I haven't had an outlet for sharing them.
So, I'm starting a brand new thing. I bought a domain from GoDaddy and set up Google Apps and Blogger to point at the new domain. So for the cost of $10/year (domain registration) I get free web hosting (10GB of storage), as many email addresses as I want, and easy to update web pages (both through Blogger and Sites). The whole set-up process, while not 100% pain free, was relatively simple. I could also easily add a couple more web services and have free audio and/or video hosting/podcasting (that way I wouldn't have to eat into my 10GB).
This idea has been percolating around in my brain since last year's NECC. Where I was presenting some of my science stuff in the Math/Science Playground. Someone recommended that I become the Open Source Science Guy since I was showing how to use Audacity to teach sound. Well, opensourcescience.com was already gone, so I bought FLOSScience.com. (FLOS = Free/Libre Open Source)
As of writing this I haven't posted any FLOSScience blog entries yet, but I have been working on the Google Site side of the new site, just in case you're interested. Needless to say, developing this is my summer project.
Subscribe to:
Posts (Atom)

